"Music produces a kind of pleasure which human nature can not do without." ~Confucius

Tuesday, May 29, 2012

Musical Glasses

You can all recall dinging on your glasses at a wedding reception, or when you were bored at a restaurant as a kid, right? It's a simple little thing that reinforces the concept of vibration producing sound (which we started in this activity), and the factors that are involved in making different pitches - high or low sounds.

This is good on a too-rainy, or too-hot day when kids are getting a little antsy. :-)

Gather materials:

  • Glasses (Glasses with a stem are best for the sound, but I doubt you'll want to break out your fine crystal for your preschooler to play with... So, tall glasses will work well too.)
  • Water in differing amounts per glass (test out the sound of each to make sure you can hear differences in pitch)
  • Metal spoons
  • Optional - food coloring for added fun. 

Gather kiddos to table. Mine saw me putting out glasses of water and immediately came to see what was going on. 

Talk about sound being made by vibration. Demonstrate that tapping a glass (around the rim is best for the most resonance) makes the glass vibrate. The more glass available to vibrate (i.e. less water) the higher the pitch (sound), and the less glass available to vibrate (i.e. more water) produces a lower sound. 
Demonstrate the different pitches and how to *gently* tap the glass.

(If you wanted to add food coloring to the different glasses, that's great too... we did a few)


"Oooooooohhh......" 


Let kid/s give it a try and make their own combinations of sounds. 
Talk about which ones are high-pitched and low-pitched and the in-betweens and why. 


Especially with my boys, I had to keep an ear on their "gentle" tapping, but they kept at this for a while on their own and seemed to enjoy it a lot. Yay! 

J had the most fun playing this one that sounded like a fire engine bell:

Have fun! 

Thursday, May 24, 2012

What We're Listening to....

I thought I'd make a few posts about what recordings we're listening to recently... (above pic of K singing with his "little buddy teddy"). As our kids' preferences change, there will be different music coming in and out of their ears, but whatever they're listening to should do GOOD things for their musical aptitude.... not destroy it (i.e. good quality singing with age-appropriate lyrics, varied and interesting melodies, etc...).

Most kids are drawn to other kids' voices, but not all - my niece, for example, prefers hearing grown-up voices. My kids love to hear kids sing, so here are the two CD's we're currently getting the most mileage out of recently (and singing around the house most often):


The Broadway Kids Sing Broadway - more info: Here.


This one is in the car and the boys look forward to rides in the car so they can sing and laugh with this one. Being broadway songs, there is an occasional word or two that some might want to avoid for little ears, but overall, we love this one. They also have a "Best of Broadway" one that's pretty good too.

Songs That Jesus Said - Keith and Kristyn Getty - more info: Here.

One great thing about music is that it can be a tool for reinforcing character qulaities that you are trying to develop in your child through the message of the lyrics. So, if you want some new faith-based songs for your child to learn other than "The B-I-B-L-E, yes, that's the book for me..." (wonderful though all those songs are!), this is a great one. Great, quality vocals, creative melodies and great messages throughout.


What are some of your favorites?

Tuesday, May 22, 2012

Good Vibration(s)


Today was a simple lesson in how sound is produced. Key word: Vibration.
Sometimes we take sound for granted... I mean, it's just... sound.
You bang a pot, it makes a sound.  You open your mouth to speak, there's sound. You touch a piano key, there's sound.
Vibration makes that sound possible... so I decided to plant some seeds for that concept today.

Super easy.
This is what we used:

A cork board
Push pins that have a plastic grip --->
rubber bands of different lengths (thin-ish ones, the thick ones are too strong for this humble activity)
Construction paper cut into long strips (2 per child).

And - NO part of this activity should be done without parental involvement and supervision! This is kind of obvious, but just in case...

OK, so gather kids and bring them to the materials.

I told mine to put the two strips into the shape of a letter "V"

Once, they figured that out, I helped get them to put 4 push pins in their letter: one at the bottom, one at each of the top ends, and one about 2/3 the way up one side. Be very involved in this - or just do it yourself. Make sure the pins are in as far as they can go.


Yes, that is my foot. So professional, I know.

Next, loop the rubber bands from one tack to the next, along the shape of the V. You should have three rubberbands on the V when you're done - one very long, one medium long, and one shortest of all.


Once you're all set up, talk about your key word for the day, "VIBRATION!" Hence our V for Vibration.
**Gently** pluck the rubber bands on each group, listening to the sound each makes and watching the rubber vibrate back and forth. Pick out the low, medium and high sounds and talk about shorter "strings" producing higher sounds, etc..


We tried some rhythms and patterns... OK, I tried rhythms and patterns and they did their own brilliant improv...  :-) 
They had a lot of fun with this... but as is their nature, they started to get a bit carried away with the "plucking" so it was time to move on to phase two. 

If you happen to have a stringed instrument in your house, this little add-on can supplement what you were just doing... if not, no worries! Just mentally check out now. :-) 

Being music nerds, we have a few string instruments that demonstrate this vibration concept... guitar and violin. 

First, demonstrate how to make vibration on each instrument. Demonstrate where low-pitched and higher pitched strings are. 

Again - with MUCH SUPERVISION, invite kiddos to pluck or strum the instruments to produce a vibration, and hence - sound! 


You can see that the two-year-old has abandoned these lesser things and moved on to Mozart Piano Sonatas... way to go, buddy.

Enjoy!

Thursday, May 17, 2012

Baby Chants about Candy

Who doesn't love candy? I mean come on... even if you're a purist who won't touch any of it, don't you still get a little excited when you walk past a bursting-with-color candy store?

We do enjoy some candy around here, so here are some chants to do with your baby or toddler while singing/chanting candy words - which are always more fun to sing about, me-thinks.

Lollipop, Lollipop
Lollipop, lollipop,
Lick, lick a lollipop.
Red, green, blue,
pink and yellow too.
Lollipop, lollipop,
sweet are you!

Bubblegum
Bubblegun - POP! 
Bubblegum - chew. 
Bubblegum pink 
and bubblegum blue. 

Motions: These are good for bouncing baby or clapping baby's hands as you chant or sing through.
For Lollipop, tickle baby on last "you!"
For Bubblegun, bounce baby high on Pop!

Handy Pandy

Handy pandy, sugar candy
One, two, three!
Top one, bottom one,
Where can it be?
Motions:  Hide a small object or treat in one hand, pound fists on top of each other as you sing or chant the rhyme, then have child choose which hand has the hidden object.


Who Stole the Cookie From the Cookie Jar?

(This one has been around for years and works best with preschoolers)
First, choose a child to be the cookie thief. We'll use.... Susie and Danny. :-)

-Susie stole the cookie from the cookie jar.
Susie:  Who me? 
-Yes, you!
Susie: Couldn't be! 
-Then who?
Danny!
Danny stole the cookie from the cookie jar...
etc...

Motions: This one is best either in a group of children (circle) or while riding in the car when there are others around to "accuse" etc...
You can clap the beat to this one too as you're chanting the first line.
Point to the accused and then open hands when asking "Then who?" etc.... (not if you're driving, please....).

Enjoy! :-)

Tuesday, May 15, 2012

Syllable Clapping with Flowers

Spring is just wonderful... Just when I think I'm going to cave in and go cuckoo from winter, spring has come to the rescue. :-)

So, celebrate the season by rhythm practice!

Today, we used flowers. This one is great because we'll:

  • Learn or review flower names.
  • Incorporate rhythm by chanting the syllables of each flower name.
  • Create our own colorful "gardens"

You'll need either pictures of flowers, or you can use silk flowers, if you have enough varieties laying around (we don't...).  I printed off some various flowers with different syllable-length-names by doing an internet search for coloring pages of each flower.
If you want to print them out in color, look for free clipart images of each flower.

Here are the ones we used....

One syllable: Rose, Fern (<-- I know it's not a flower, but I needed another one-syllable one that the kiddos were sort of familiar with...)
Two Syllables: Tulip, Lily, Daisy
Three Syllables: Daffodil, Buttercup, Sunflower
(If you want a four-syllable one, you could use Dandelion, or some other one... but we just used the ones above.)

You can paste each into a Word Doc, adjust the size, and type the flower name.
Print off, cut out and you're good to go.


Other materials: construction paper (background... we used blue for the sky), some extra stems or leaves, brown paper for soil on the ground, crayons/markers/paint and glue.

Gather kiddos and have them color flowers (if needed). I helped them choose a correct or at least appropriate color for each one as we rehearsed their names...


Next, get your "garden bed" ready:

Little J really wanted a leaf in the middle of his page.... :-)

Next, choose two or three flowers to arrange on the page (don't glue yet).
As child chooses each flower, clap and chant that flower's name and have them imitate it back.

Once all three have been chosen, clap them rhythmically in a sing-songy way.
Chant it loud and proud along with them.
 Sometimes it helps to point along once in a while....
And, not every activity appeals to all children...
He did jump in once in a while, if no one was paying attention. Otherwise, he got shy. Poor little J... :-)


After you've created a few different "gardens," finish off by having them glue on their favorite ones, then either chant that one as the grand finale, or if you've exhausted their focus, say what a wonderful job they did and release them to go play. :-)


Have fun!
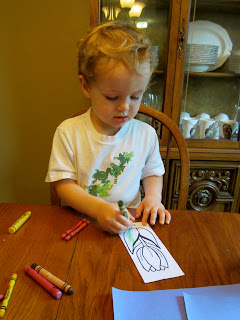
Friday, May 11, 2012

Buckets of Fun


Today was a lovely day... to go outside and make some noise.
We have some buckets laying around, which many of you do as well.... So, we continued in our drum theme this week and did some simple tasks with the buckets.

All you need for this is a kid, a bucket, and a few sticks of some sort. We do have drum sticks around the house, but they have been moved somewhere by some toddler who will remain nameless... so we used markers today.

You'll need a bucket-drum for each kiddo....

We gave one to the baby, but he had other plans...

My goals today were to do simple imitation patterns and descriptive sounds.

So, after a bit of 'free drumming,'  mom started by playing a simple rhythm      (ta, ti-ti. Or, Long, quick-quick, etc. etc....)
and they had to imitate. K (4) did fine, J (2) banged back roughly the same thing every time.  :-)

We went around and each tried to "imitate" the sounds made by the one who's turn it was.
J often did sound effects with his demonstrations. Very amusing.

Whereas your student may desire to just bang aimlessly, to develop rhythm and musicianship, do your best to get them thinking about imitation, patterns, loud/soft, fast/slow, etc...

****Remember, your role is demonstration! Show them how it is done correctly and help them with ideas. They want to succeed in these little things and they need you to help them to understand and to inspire them.


Next, we described sounds. For example,
"How would it sound if we were tiptoeing?"  or "What would it sound like if we were marching?" 
Speed: 
"What if we were running away from a big monster?"  or  "What if we were walking very, very slow?" 
"What if we were walking first, then started to race?" 


Then... what different ways can you make noise on the drum?

Here's K dropping his "sticks" rather than striking. 


So simple, so much potential.... so fun! Enjoy!

Monday, May 7, 2012

Drum "D" - Learning about Timpani


Well, this morning I asked K if he was ready to start learning the violin soon. To which he replied a firm, "No." Sigh.... I'll try again later. But, you may know that he has always loved drums... whenever asked which instrument he'd like to play, that is his answer.
So, today I thought I'd combine some craft-time with music-time in a "Drum D" - only kicking it up a notch to make the drum a very sophisticated, orchestral instrument.... the kettledrum - aka timpani).

So, we gathered some materials.... 
Construction Paper (any colors, but if you want to be closest to the drum, use brown for the D and white for the drum head....
plastic straws
Felt (cut into small circles for mallet head)
Glue
Crayons/Markers

You can also use a book with pictures of the kettledrum to add to your instruction.

Here's the one I had on hand and we used this one today, keeping it open on the table as we talked about the drum: Meet The Orchestra by Ann Hayes.


Gather your kiddo/s and talk about the D for Drum concept, then have them figure out which way we need to turn the D for it to look like the kettledrum.... (I know you purists out there think I should have a K for kettledrum.... (which unfortunately wouldn't work very well) but you'll just have to work with me on this one!)


Have child glue the drum to their paper in the correct position.

If you used brown for the drum, great! If not, you can have them color it brown.

Next add 2 legs on the bottom for the drums' stand.
Then, have child draw him/herself playing the drum (I had to help 2 1/2 yr. old J with this, but he tried!).

Add a white stripe to the top for the drum head.

Next talk about Mallets (mallets are those sticks that you strike the kettledrum with, btw...).
Cut your plastic straws to make two small sticks, and cut circles out of your felt.
Glue straw-sticks onto each hand, then glue the felt circle at the end for the head of the mallet.


Voila! A wonderful example of kettledrums for your little budding musician!

 To take it ones step further, find some good videos of timpani playing on YouTube or another source. *Caution - Check out the YouTube videos on your own first, then put them to "full screen" on your computer to protect little eyes from the sometimes undesirable advertising images you probably don't want your tot seeing.

K loved this... here he is imitating the cross over sticking as observed by one performer:
Link of this video: Go here.
Here he is dancing around to the fast rhythms of another example:

(I just noticed that the laptop does not look very sturdy... Don't worry, honey... your laptop is just fine!)

This last one was a cool video of a piece called Timpanic MemBRAIN, (link:  Go Here) - it's 4 guys doing some fun percussion quartet playing.

Although I would love to see K learning Bach Minuets on violin, it was pretty cool to see him get so excited over kettledrums. :-)

Have fun!