"Music produces a kind of pleasure which human nature can not do without." ~Confucius
Showing posts with label Instruments. Show all posts

Tuesday, May 14, 2013

DIY "Peter And the Wolf" - Characters with Instruments


Who doesn't love "Peter and the Wolf" by Sergei Prokofiev? The melodies, instruments, story, etc....
Well, you can create your own Peter And the Wolf-type activity at home with a favorite story of your choosing.  All you need is a favorite book, some various instruments and some kids!
We had a lot of fun with this, hopefully you can too!

I chose a story that was simple, had a few re-appearing characters and was already a well-known story to my kiddos..... "The Little Mouse, The Red-Ripe Strawberry and The Big Hungry Bear" by Don and Audrey Wood.

They love this story and it leant itself easily to 3 characters who would each get an instrument sound: the mouse, the strawberry and the bear.... and since I had 2 boys participating in this and one would be upset if he didn't have as many as his brother, I also stuck in the page turn as needing an instrument.

First, I printed out a sheet with each "character" (again, pics from a google image search. And yes, I am STILL out of my color ink cartridge!)


Next, I had the kiddos go and gather instruments.


They chose which instruments should be assigned to which characters (It was fun to see which instruments they picked for each one; the drum went fairly easily to the "Big Hungry Bear").
We practiced playing each instrument when the character's name was said before starting the book.


Then, the performance began with a musical introduction (which was incredibly loud and I'm amazed it didn't wake up little brother).

We read through the story once (with me helping them with extra emphasis on particular words and waiting for them to remember which instrument was what), then finished with an exciting musical finale where they all played as loudly as possible.


We went through it again under the instructions that they had to remember to use their instrument on their own, and by this time, they were pro's! :-)

They were uber excited about this and wanted to try it again with "Peter Pan" - another favorite - which has many more characters, so we recruited more instruments and went to round 2, which was a little harder to keep track of, but still lots of fun.

This was great for more opportunities to use instruments, matching instrument sounds with character-types,  practicing listening and remembering skills, and a great, user-friendly connection to a great piece of music - since you can remind them of how Prokofiev used different instruments for his characters in his musical tale,  Peter and the Wolf.

We may try this again this week with "Where the Wild Things Are" since especially that middle "rumpus" section would work well for some instrumental improvising. :-)

What other stories would you use?

Have fun!


Monday, March 4, 2013

Teaching about the Orchestra!

The boys and I are getting ready to go to an educational concert based on the wonderful story, "Beethoven Lives Upstairs."  They are excited, and a bit confused about what this experience will be like.
So, we created a concert experience to a) teach them about what it's like to play in an orchestra, and b) get them prepared for going to see the concert.

I must say that my good friend Elmo has been helpful in this venture. The CD "Elmo and the Orchestra" which I mentioned before in this post, has been very instructive for the boys in learning more about instruments and classical music. I found myself referring to Elmo a lot in our activity.... like, "remember Elmo called them the BIG double basses?" and "Yes, maybe the orchestra WILL play the 'storm' one."

So, our tasks today were to assemble an orchestra, arrange them on a stage, gather an audience and enjoy a wonderful concert!

Enter..... plastic people. Including super heroes. And pirates.

First, I went online and dragged and resized some coloring pages of selected orchestral instruments to be pint-sized for our purposes.

If you'd like to join in the fun, pick a few of your favorites, arrange their size to fit your peeps and print them out! Most of the ones I printed out had lighter lines, so they're harder to see in the pic... sorry. :-/

Next, grab some coloring utensils, scissors, tape, a box for the stage and lots of little plastic people.


Have kids color the instruments any colors they'd like. Go over the names of the instruments, whether it's a shiny brass, a percussion, a string or a woodwind instrument. The instruments we used were violins, double basses, clarinets, trumpets and timpani.


When each instrument is done being colored, cut it out and ask the child/ren to assign instruments to various "players."
They can use tape to affix the instruments to each person, they may need help depending on age.
(The "stage" has a picture drawn on a piece of paper by K (above) when asked to draw an orchestra.)


  Once all the instruments are assigned, you can help your kids make sure the "musicians" sit/stand with like instruments - the "buddies" stick together, and they all work hard to make awesome music. They're like players on a team - similar to baseball, soccer, etc. teams.

Next, we had Daddy the pirate, Mommy, K and J come to the concert. They gave their ticket to the man at the "door" and  found their seats. K brought along his lego robot spaceship and J brought along his sports car. Normal occurrences in concert halls, of course.

The orchestra played their beautiful music. It was exciting, thrilling, and very loud. :-)

If you'd like, you can play a portion of a symphony here for some listening fun. Just grab one of your favorite recordings, or if you have no idea where to start, go to YouTube or Pandora, etc. and type in "Beethoven Symphony" or "Mozart Symphony" or "Dvorak Symphony" and you'll get plenty of options.
 (Thank you, Batman, for that thrilling violin solo.)
(one pirate needed a block because he was too short...)

...and the audience rose to their feet in grateful applause!

We were having so much fun, we realized we forgot a very important person... the conductor. We quickly grabbed one from among the eager volunteers and all was well.


This was great fun and helped get the boys more pumped for seeing the real, live orchestra soon!
Hope you can give it a try too!

Tuesday, January 22, 2013

Learning About Instruments - Double Bass


The boys both have a current love of the Double Bass, or in their description, "the BIG double bass!!" Whether they only love it because it's huge, or because of its sonorous, low timbre, I don't know... but I will take it and run with it for now! :-)

For 'art time' today, we made a simple picture with the Double Bass. Here it is if you would find it helpful for an instrument your little one shows a fancy to. I planned to incorporate each boy drawn into the picture and also make a connection to the letter "d" for double bass.

Gather some materials:
Picture of instrument, crayons/markers, glue, and a cut-out picture of your child's face (from an extra photo or printed off your computer). We also had two thin black strips to glue on as the bow.

I do a google image search for coloring pages (i.e. bass violin coloring page) when I do these sorts of activities as they are easy to transfer to a Word doc and then format, and they often have nice, clear lines.


Print out your pictures and have children color them appropriate to instrument's color (if they'll cooperate and aren't feeling unusually creative... "No, I want a purple Double Bass!" etc...).

Bonus points for having a YouTube, etc. video of the instrument being performed in the background for reference. This one was an awesome tango for double bass.


After they colored, we made the educational connection to "D for double bass", since it makes "d" sounds when plucked (like, "Da dum, dum dum, dee, dee, dum, dum, etc...) So, they drew some "D"'s coming from the instrument.

Then, we glued on each boy's face, and they completed the body, with hands on the instrument, then, finally they glued the bow on.
 

Simple, hopefully meaningful - and the more exposure, the better!

Enjoy!

Wednesday, December 19, 2012

Festive Shaker / Drums!

It's such a great time with little kids and Christmas. I never knew it would be so fun! The kids just naturally LOVE Christmas and everything about it.
Since all our boys like to make music and, often, be loud about it, we made some Christmas-themed shakers to accompany their festive mood and silly carol singing. These certainly don't need to be Christmasy, but ours are (sort of.... you'll see....)

So, if you need a project to set your little one/s on while you bake those cookies, this may be it!

Materials:
A tin can, rubber band, helium-sized balloon, items to put in can (like beans, pasta, rice, etc... we used jingle bells), paint, Mod Podge, and whatever else you'd like to incorporate.

1. Gather kiddos and have them paint their can in festive colors.
 You may need to come help once or twice....
These didn't turn out quite as lovely as I thought they would. Another idea that might be fun is to cut up some wrapping paper and glue that all around the can, then Mod Podge it. Maybe next year..

The boys thought they were masterpieces though, and excitedly put their jingle bells in the can when the painting was done.

Next, the supervising adult (with or without cookie dough on your fingers), should cut the head of the balloon. Make sure you cut it so that it is a semi-circle, and not still tapered at the end.
The supervising adult should next stretch the semi-circle of that recently-cut balloon across the open end of the can, stretching it taut and affix it on the side of the can by wrapping the rubber band around twice or however many times it will go.


The boys wanted to put some ribbon around them too. 
After they're dry, shake and enjoy!! Be careful - if you use the jingle bells like I did, they are LOUD! If you have an exuberant child like I do, you may wish you had used something a bit softer. :-) 
I Mod-Podged after they went to their naps so the paint didn't peel off and the surface was smoother. 

and off he goes!

It can be a shaker or a drum! Use hands or drum sticks. You could even scrape the sides with a stick too and use it as a guiro. 

Baby M liked it too. :-) 


Enjoy all the music making around this time of year and be sure your kids get in on it! 

Friday, October 5, 2012

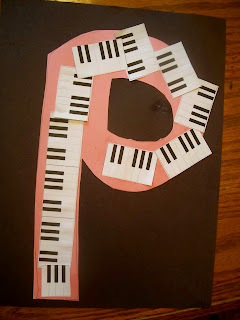
"P" for Piano

We're talking about letter "P" things this week around here (especially pumpkins, of course). So this little activity fit in perfectly and is oh-so-simple.


You'll need some construction paper, scissors, glue, and a print-off of some piano keys.
To do this print-off, do a google image search for free piano key clip art. Copy and paste that picture into a Word/Google document and adjust the size accordingly. Copy and paste it across each line. One full page should be plenty for one child. I used 1 1/2 pages for my two.

Cut the piano keys out into long and small strips.


Next, cut out a big letter P. You can cut it out for younger kiddos, or let your older, more scissor-savvy ones do it on their own. We chose "pink" for letter P too, although you won't see any pink anywhere else in our house...

From here, they could do it on their own, really. But, I was the photographer, so I stayed around.

Have child line the P with glue from glue stick and paste the piano keys around, using the smaller ones for the curve in the P.


Affix onto a backdrop if you'd like and hang proudly in your home!

....or just act silly when mommy asks you to hold it up....

A good idea also is to have some piano music playing while this project is being worked on. You can look on itunes or YouTube, Pandora, etc.
Some recommendations: Mozart Piano Sonatas, Chopin Waltzes, Beethoven Piano Concertos or Sonatas.

Have fun!